A Furniture Revival

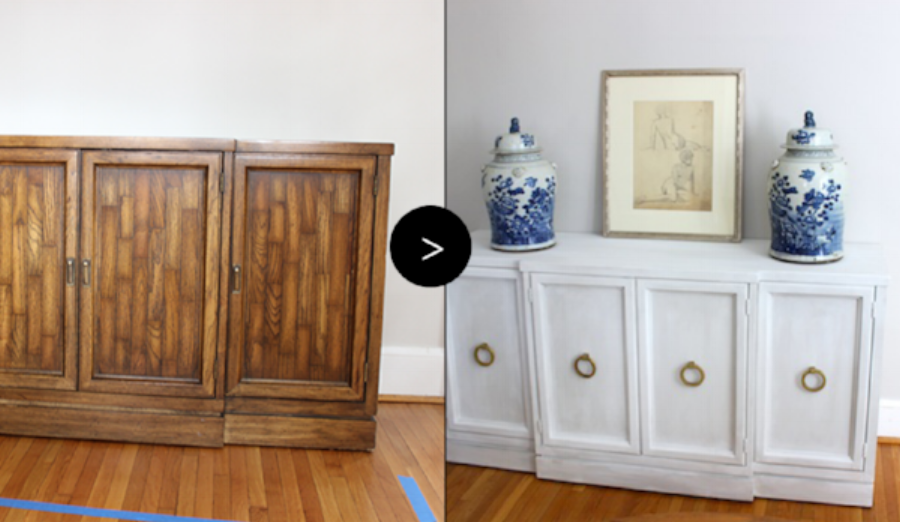
What started as a way to save a buck in my home's decor is quickly turning into my latest hobby - refurbishing furniture. You all may remember my first furniture makeover project where I turned this dated console into a contemporary buffet for my dining room.
I've been working on a decor plan for the main bedroom and fell in love with these Hollywood regency style nightstands. When the price tag was out of my budget, I went to my backup plan. Scouring Craigslist and secondhand furniture stores for something I could makeover for a similar look.

I found these pieces at a secondhand store and saw immediate potential. While they didn't match, they shared the same clean lines, brass footing and brass plates that I thought I could make work. My plan was to makeover each piece to have one drawer at the top and an open bottom, painted in a milky gray and with two matching bamboo pull handles. Here's the before...

I started by removing all of the existing hardware and then sanding and priming each chest to ensure the paint would stick without flaking. Even though I planned to use chalk paint, which boasts no sanding or priming needed, it can be expensive so priming also lets you use less coats if you are painting a light color over dark wood.
After the prep work, I started installing a drawer into the shelf chest using the hardware and tracks from the shelf I took out of the chest. The extra wood for the drawer tracks and shelf I picked out and had them cut at The Home Depot. This part was definitely the most difficult.

After A LOT of hard work and paint, dry, repeat...here's the final product! They are yet to be styled but I was so antsy they've moved into my bedroom and I LOVE them. I kept the shelf on the left chest to store books, but left on fully open at the bottom. I'm really happy with how they turned out and they have already made my bedroom feel a little bit more put together.

A closer look at the paint, which is Annie Sloan's Paris Gray, and the brass bamboo hardware is the Kanota Drawer Pull in un-lacquered brass from Rejuvenation.


I used the Zissner 123 water-based primer that I had seen recommended on other DIY blogs. For the sanding and drill handy work, I used the below tools. I highly recommend an orbital sander. It cuts down on the pain of having to hand sand. This drill is my favorite in fact it was CT's and I've now claimed it as my own. It's cordless and has multiple speeds so you don't strip screw heads. For the finish, I used a polycrylic to give me a protective coating. It darkened up the paint a little bit and gave it some interest which I loved.
<div class="shopthepost-widget" data-widget-id="1655655"> <p><script type="text/javascript">!function(d,s,id){var e, p = /^http:/.test(d.location) ? 'http' : 'https';if(!d.getElementById(id)) {e = d.createElement(s);e.id = id;e.src = p + '://' + 'widgets.rewardstyle.com' + '/js/shopthepost.js';d.body.appendChild(e);}if(typeof window.__stp === 'object') if(d.readyState === 'complete') {window.__stp.init();}}(document, 'script', 'shopthepost-script');

JavaScript is currently disabled in this browser. Reactivate it to view this content.
If you follow me on Instagram, you know our cat Luc is a huge fan too. Can't keep him off of them!

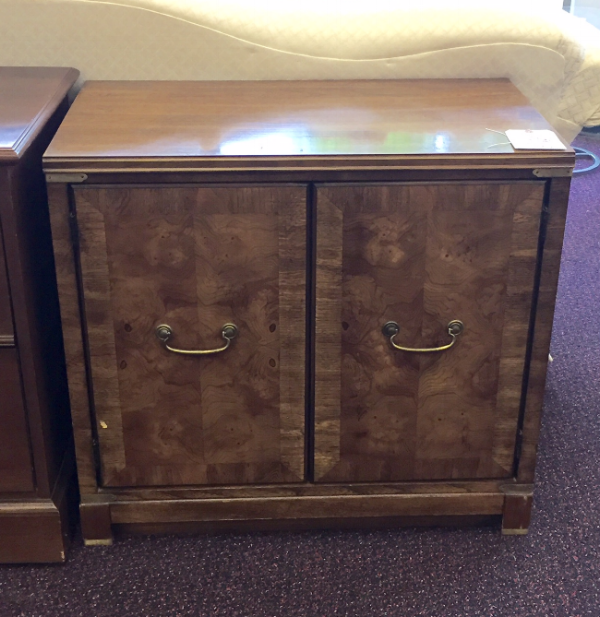
Next up on my list is this beauty I snagged at the same time. I am thinking a creamy white with brass hardware, but leaving the marbled wood front exposed. No home for this one yet, so we'll see!